!uv --versionuv 0.12.9 (9f9286029 2026-09-01 aarch64-apple-darwin)Last year, I wrote about why I ditched conda & pip for Pixi. While I do love Pixi, I often find myself working with uv in my activity as a consultant as most teams I’ve worked in the last couple of years have it in their toolchain.
When I started using uv, a colleague of mine showed me a couple of commands and started working with it right away. That same colleague also told me that uv has a pip-compatible API that I can use to make my life easier at first.
While his guidance helped me get started quickly, it’s that same guidance that made me really struggle later and not understand some things that were going on with my uv usage.
The goal of this blog post is to share some painpoints and some lessons that I’ve learnt throughout this year. This is not an introductory blog to how to use uv, ample resources can be found online for this.
All the commands shown in this blog post have been run using
!uv --versionuv 0.12.9 (9f9286029 2026-09-01 aarch64-apple-darwin)Almost all the commands in uv come down to modifying 2 files and a folder:
pyproject.toml
uv.lock
.venv folder
The quickest way to see it is to add a package to a fresh project. I created mine with
# The `--bare` flag gives a project made of nothing but a `pyproject.toml`
uv init --bare --python 3.14 --name uv_blog_demo
Initialized project `uv-blog-demo`Let us now install pandas and see what happens to the files above
uv add pandasUsing CPython 3.14.6 interpreter at: /opt/homebrew/opt/python@3.14/bin/python3.14
Creating virtual environment at: .venv
Resolved 6 packages in 498ms
Prepared 2 packages in 1.91s
Installed 4 packages in 25ms
+ numpy==2.5.3
+ pandas==3.0.5
+ python-dateutil==2.9.0.post0
+ six==1.17.0With this command alone, all three have seen their content change.
pyproject.toml holds ranges rather than exact versions. I typed uv add pandas without asking for any version in particular, and uv wrote down a lower bound:
dependencies = [
    "pandas>=3.0.5",
]
The bounds of dependencies can be controlled but this is not the topic of this post.
uv.lock is where the packages of the Resolved 6 packages line ended up. Ranges are gone and every package gets one exact version, a hash per downloadable file, and markers saying on which platforms it is needed.
[[package]]
name = "pandas"
version = "3.0.5"
dependencies = [
    { name = "numpy" },
    { name = "python-dateutil" },
    { name = "tzdata", marker = "sys_platform == 'emscripten' or sys_platform == 'win32'" },
]
sdist = { url = ".../pandas-3.0.5.tar.gz", hash = "sha256:dca3734d6ab7c906e6730f0788b0a1dbb9f2467731f9711f77995c8e9d62d712" }
wheels = [ ... ]
If someone wants to reproduce your environment and wants to have the same .venv as you, uv.lock is what makes it possible, as it contains the specific versions you will use in your .venv.
They do need pyproject.toml next to it though. Running uv sync in a folder that contains only uv.lock stops right away:
error: No `pyproject.toml` found in current directory or any parent directoryNote that uv does dependency resolution for other platforms as well, not just the one you’re using. This can be controlled as well but it’s outside the scope of this blog post.
The impact on .venv is the Installed 4 packages line: those packages were installed in .venv/lib/python3.14/site-packages. Only 4 packages were installed and not 6 packages because:
tzdata doesn’t need to be installed on mac, and is only included in case it’s win32 or emscripten
The sixth entry is uv-blog-demo, the project itself. As we’ve run uv init with --bare, it is not a package, so there is nothing to install for it.
Commands in uv usually impact one or more files at once.
The chain between them is always the same, and it has two steps:
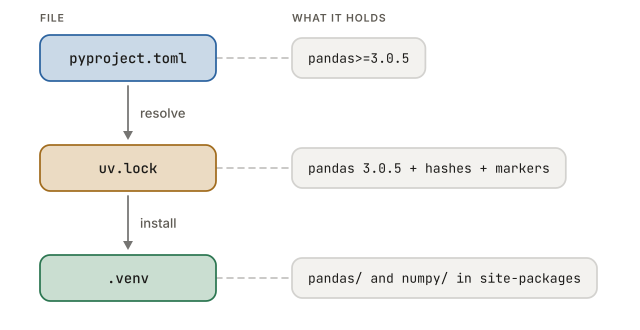
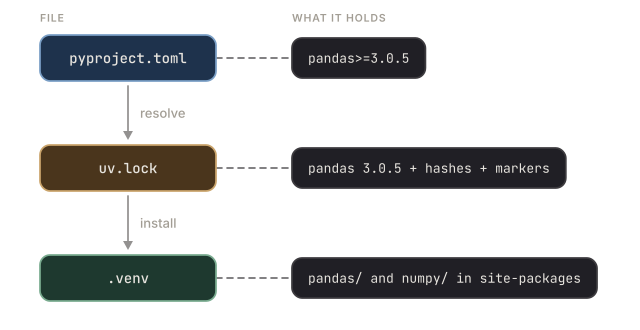
What changes from one command to the next is how much of that chain it walks through:
uv lock runs resolve only. It reads the ranges in pyproject.toml, picks exact versions and writes them to uv.lock, without touching .venv.uv sync runs resolve, then install. It re-locks if pyproject.toml has moved ahead of uv.lock, then makes .venv match the lockfile exactly, which includes removing packages that are not in it.uv add pandas edits pyproject.toml first, then runs the resolve and install step.uv run runs the same two steps before running your command, with one difference: it installs what is missing but leaves extra packages alone.You’ll usually find yourself working with uv add, uv sync and uv run.
Also, it’s important to keep in mind that the flow also only ever goes downward. Whatever you do directly to .venv is never recorded in uv.lock, and whatever is in uv.lock never edits pyproject.toml. This rule is what the next section is about.
uv add or uv pip install ?First thing to know is that uv add pandas and uv pip install pandas are not equivalent at all!
They don’t write to the same files. Let us run each of them and see what changes.
uv add writes to all three. Let us add rich to the project:
uv add richResolved 10 packages in 281ms
Installed 4 packages in 12ms
+ markdown-it-py==4.2.0
+ mdurl==0.1.2
+ pygments==2.21.0
+ rich==15.0.0pyproject.toml sees rich added to the list of its dependencies
dependencies = [
    "pandas>=3.0.5",
    "rich>=15.0.0",
]
uv.lock gets the exact version that was picked by the dependency resolver:
[[package]]
name = "rich"
version = "15.0.0"
and the four packages are now in .venv
uv pip install only writes to .venv. Say I am in the middle of something and I just want to plot a dataframe quickly, so I grab matplotlib the way I used to with pip:
uv pip install matplotlibResolved 11 packages in 658ms
Prepared 7 packages in 1.73s
Installed 8 packages in 16ms
+ contourpy==1.4.0
+ cycler==0.12.1
+ fonttools==4.65.0
+ kiwisolver==1.5.1
+ matplotlib==3.11.2
+ packaging==26.3
+ pillow==12.3.0
+ pyparsing==3.3.2matplotlib is installed and I can import it right away, but searching for it in pyproject.toml and uv.lock returns nothing:
grep -c matplotlib pyproject.toml uv.lockpyproject.toml:0
uv.lock:0Nothing wrote it down in either of the two files. A colleague cloning the repository and running uv sync will not get matplotlib.
And it disappears the day someone syncs. uv sync makes .venv match the lockfile exactly, which also means removing whatever is not in it:
uv syncResolved 10 packages in 3ms
Uninstalled 8 packages in 83ms
- contourpy==1.4.0
- cycler==0.12.1
- fonttools==4.65.0
- kiwisolver==1.5.1
- matplotlib==3.11.2
- packaging==26.3
- pillow==12.3.0
- pyparsing==3.3.2One nuance that cost me a couple of hours to get my head around: uv run does not delete the extra packages installed in .venv. Straight after uv pip install matplotlib, running uv run python -c "import matplotlib" works. By default, uv run installs what is missing but leaves extra packages alone, while uv sync performs an exact sync, removing any extra packages that don’t appear in the lock file. So an environment polluted with uv pip install keeps working for days, until the day you run uv sync and then your installed packages get uninstalled.
So when should you use uv pip install? In my experience, never.
And if, like in the example above, you only need a package for one command, there is a better option:
uv run --with matplotlib python -c "import matplotlib; print(matplotlib.__version__)"Installed 11 packages in 33ms
3.11.2matplotlib was available for the duration of that one command, and pyproject.toml, uv.lock and .venv were all left untouched.
The behavior of uv sync and uv run can be changed by passing arguments to these commands but I highly recommend to stick to the default behavior of each, it just makes it easier to remember what each does.
dev group is the default!So now we have an environment with pandas and you want to add pytest to the group of your dev dependencies, the command is easy:
uv add --dev pytestand the result shows that pytest was installed
Resolved 15 packages in 296ms
Installed 4 packages in 6ms
 + iniconfig==2.3.0
 + packaging==26.3
 + pluggy==1.6.0
 + pytest==9.1.1
Your pyproject.toml should show something similar to this:
dependencies = [
    "pandas>=3.0.5",
    "rich>=15.0.0",
]

[dependency-groups]
dev = [
    "pytest>=9.1.1",
]
The question is what happens next time that you do uv sync: is uv going to install the dev dependencies as well, or just the real dependencies of your project ?
Let us delete completely the existing .venv and redo a uv sync for the result to be crystal clear
rm -rf .venv && uv syncUsing CPython 3.14.6 interpreter at: /opt/homebrew/opt/python@3.14/bin/python3.14
Creating virtual environment at: .venv
Resolved 15 packages in 2ms
Installed 12 packages in 28ms
+ iniconfig==2.3.0
+ markdown-it-py==4.2.0
+ mdurl==0.1.2
+ numpy==2.5.3
+ packaging==26.3
+ pandas==3.0.5
+ pluggy==1.6.0
+ pygments==2.21.0
+ pytest==9.1.1
+ python-dateutil==2.9.0.post0
+ rich==15.0.0
+ six==1.17.0uv didn’t install just pandas (and its dependencies), it also installed the dev dependencies (pytest in this case) even though nobody asked for them.
What you should know is that uv considers the group with the name dev as the default. Upon running uv sync with no additional arguments, it will always install your base dependencies with the dev dependencies on top of them.
When I was first using uv, this behavior startled me as I was expecting to install just the base dependencies, the ones appearing in dependencies in pyproject.toml.
If you create some other group for linting purpose and put ruff inside of it, ruff will not be installed unless you ask for that group explicitly.
uv add --group lint ruffRun uv sync and you’ll see that ruff is not installed.
Two things to know before moving on from this section:
uv sync --no-default-groups installs just the base dependenciesuv sync by default using default-groups entry in pyproject.toml[tool.uv]
default-groups = ["dev", "lint"]Other nice uv cli commands exist, I recommend that you check the docs for that.
uv sync --locked in CIOne of the nicest things about uv sync is that it syncs everything and fixes any discrepancies that might exist. If your pyproject.toml has some dependency that is not present in uv.lock, it will be added to uv.lock and installed in the project’s .venv.
The job of the CI is to check that all is good and raise errors if not, not to fix problems that exist in your codebase.
uv sync --locked does exactly what uv sync does, minus the fixing: when uv.lock no longer matches pyproject.toml, it stops with an error instead of updating it. Either the lockfile you committed is already correct, or the build fails.
Here is a real situation I’ve been in and in which the CI failed me because of using uv sync.
Let’s say a colleague and you are working on two branches to add different things to our project. One branch adds scikit-learn for the model, another adds seaborn for the plots. When they meet, both files conflict:
git merge feature/plotsCONFLICT (content): Merge conflict in pyproject.toml
CONFLICT (content): Merge conflict in uv.lockpyproject.toml takes ten seconds to fix, you keep both lines:
dependencies = [
    "pandas>=3.0.5",
    "rich>=15.0.0",
    "scikit-learn>=1.9.1",
    "seaborn>=0.13.2",
]
uv.lock is tons of lines here. It is generated, its diff tells you nothing, so you pick a side and move on (it’s bad, don’t do this!!!)
git checkout --ours uv.lockThe merge commit now asks for seaborn in pyproject.toml and has no trace of it in uv.lock. git status is clean and nothing looks wrong.
If the CI runs uv sync on that commit, uv.lock will be updated from pyproject.toml and you’ll get the right dependencies (both scikit-learn and seaborn), and all tests in the CI will run smooth.
Resolved 30 packages in 7ms
Installed 26 packages in 98ms
 + cloudpickle==3.1.2
 + contourpy==1.4.0
 ...
 + seaborn==0.13.2
So, just using uv sync doesn’t allow you to see the discrepancy that exists in uv.lock.
With uv sync --locked, the same commit raises an error
error: The lockfile at `uv.lock` needs to be updated, but `--locked` was provided.

hint: To update the lockfile, run `uv lock`.
The message tells you that there is a problem and how to fix it.
Another thing to note: if you use uv run in CI instead, it re-locks too, so a step that calls uv run pytest without syncing first brings back the same problem. The flag exists for this command as well: uv run --locked pytest.
The thing to take from this is that the CI is a place to spot the errors and not to fix them, so use --locked with uv commands. If you’re stubborn, then sync but push the updated uv.lock back to the branch (ew, shouldn’t be doing this).
This part is about the difference between uv run, uvx and uv tool as well as the problems that might arise when using them.
Only uv run knows about your project, the two others don’t:
uv run <command> looks for the command inside your project’s .venv first
uv tool install <tool> installs the tool in its own environment and puts it on your PATH, so it’s available everywhere, a bit like brew install
uvx <tool> is a shorthand for uv tool run <tool>, it runs the tool without touching your project
You’d think that the first one always gives you the version pinned in your pyproject.toml. It doesn’t.
Now, here is the situation that I encountered and that drove me mad for a couple of hours before deciding to read the docs and understand what’s really going on. Let’s say that, as in section 2, we have added ruff to a lint dependency-group, but this time we’ve pinned it to an exact version so that everyone would have the same rules by default
uv add --group lint "ruff==0.16.0"Our pyproject.toml now has a section that looks like this:
[dependency-groups]
lint = [
    "ruff==0.16.0",
]
A few days later, I come back to the project, pull my colleague’s changes and run a uv sync before getting back to work.
Let us now lint our code using uv run
uv run ruff check .All checks passed!While everything is fine, is it really the ruff I pinned that just ran?
uv run ruff --versionruff 0.14.0It is not the case. My pyproject.toml clearly states that ruff is 0.16.0 and I just linted my code with 0.14.0, which is a version with different rules and different defaults.
lint is not a default group, so after a uv sync there is simply no ruff inside .venv. And when uv run doesn’t find a command in the project, it doesn’t stop there; it falls back to whatever it finds on your PATH.
On my machine that is a ruff I installed globally months ago and never thought about again:
uv tool install ruffHad I never installed it, I would have gotten a clear error instead:
error: Failed to spawn: `ruff`
  Caused by: No such file or directory (os error 2)
which is the behavior I want to have.
To recap, uv run looking at .venv first and at PATH after is what makes the wrong version silent.
To run the ruff that the project pins, you have to ask for the group it lives in:
uv run --group lint ruff --versionruff 0.16.0At this point you might think that uvx is the way out of this mess, as it has nothing to do with your project and simply runs the tool:
uvx ruff --versionruff 0.14.0Still 0.14.0! What you should know is that uvx downloads the latest version of a tool and runs it, unless you have already installed that tool with uv tool install, in which case it quietly reuses the one you installed. The only way to know what uvx is running is to specify it clearly in the command
uvx ruff@0.16.8 --versionruff 0.16.8The two things that you should keep in mind:
uv run looks in .venv first and in your PATH after, so it can happily run a tool that your project never asked for. If the tool belongs to the project, run it through its group: uv run --group lint ruff check .uvx and uv tool install live outside of any project. They are meant for tools you want everywhere, and installing a linter or a formatter that way is exactly what creates the confusion above.Now, what I do to not have this problem is to run tools like ruff using uv run python -m ruff. python -m only looks inside .venv and never falls back to PATH, so when the tool isn’t there I get a clear error instead of a wrong version.
The other way out is the default-groups entry from section 2: put lint in it and ruff is always in .venv, so uv run ruff never has a reason to look at your PATH.
While there are many things that I’d like to talk about, this blog post is getting long, so I’ll stop here.
Here are some of the topics I might cover in an upcoming post about uv:
pinning the python version of a project, and what uv does behind the scenes to get you the interpreter
installing pytorch with GPU support, which comes down to telling uv to pull some packages from a different index
the uv cache, and how to mount it as a docker volume so that your builds stop downloading the same wheels over and over
If there is one thing to keep from all of the above, it’s that almost every problem I had with uv came from not reading the docs, but discovering this the hard way makes the lessons stick better.